December 30, 2008

Two Kinds of Easy Gluten Free Party Salsa

I've been traveling all over the place lately. Just yesterday I arrived home after a week-long stay with family outside Marietta, GA. Tomorrow I'll be heading north to Baldwinsville, NY to spend New Year's Eve with our good friends, David and Cheryl Vermillya.  Spending New Year's Eve with Dave and Cheryl, eating great food and drinking fine wine has been our ritual for the last three years. On New Year's Day we all get up, drink some strong coffee, eat breakfast, and head off to Beaver Lake for cross-country skiing or a hike.  It's a great way to start the year:)

These two salsa recipes are crazy easy.  If you have the time, there are a ton of salsas that call for hours of slow cooking and lots of work. Not these. These are the kinds of salsa you make when time is short. There's a mild corn salsa, and a simple salsa verde (green salsa). I'll be mixing up a batch of the corn salsa for our trip north. It can be made with frozen corn, or cut fresh off the cob. It's good either way.


Corn Salsa Ingredients
  • 1 cup corn kernels
  • 1 tomato chopped
  • 1 jalapeno pepper, minced
  • 1 tbsp. red onion, chopped
  • 1 tbsp. cilantro or parsley, minced
  • 1 tbsp. lime juice
  • 1 tbsp. olive oil
  • 1 garlic clove, minced

Preparation Directions
  1. Combine all the ingredients in a medium bowl and mix together. Cover and chill for at least 1 hour to blend flavors (more time it sits, the better it tastes!)
  2. That's it! I told you it was easy.

Simple Salsa Verde Ingredients
  • 4 (4oz) cans of La Preferida Mild Green Chiles - roasted, peeled, and diced
  • 1 1/2 cups drained canned tomatillos, chopped
  • 2 garlic cloves (minced)
  • 1 cup GF chicken broth ( I used Kitchen Basics vegetable stock)
  • 2 tomatoes, chopped
  • 1 cup cilantro, chopped

Preparation Directions 
  1. Mix it all together in a bowl, cover and chill for as long as you can. 
  2. Eat with pure corn tortillas and enjoy!

Happy New Year!!!


December 17, 2008

Nice and Easy Gluten Free Chili

Lately I've been getting into experimenting with chili a lot.  Before a couple of months ago I've never actually made chili. Growing up in Syracuse introduced me to the joy of eating steaming bowls of chili outdoors, among crowds of half-inebriated people.  Every year The Cuse has a chili cook-off, where scores of local restaurants prepare and serve up free chili for everyone.  There's live music, art vendors, and of course BEER TENTS!  Although Syracuse was a pretty dark and dreary place (weather-wise), the community puts on a wide variety of  cool, and free, downtown events. There was always something going on.

This chili is super easy, fast and filling. There are a lot of different chili powders out there to choose from, with various levels of hotness.  Good chili is all about one's specific tastes.  If you aren't used to lots of hot spice in your foods, start with the mildest chili you can find and be sparing.  I've found the more I experiment with chili peppers, the more tolerant both my tongue and stomach become.  In addition, I'm being opened up to a whole new world of taste sensations. 

It's funny, the more I cook, the more I want to cook.  I love the challenge of it. I love the never-ending variety of amazing foods one can create. And of course, I also love to eat:) With all the cultures around the world, you could really cook something different for every meal, for the rest of your life. That's just cool! 

I've made about 5 different chili dishes just this month. Last week I made a kickin vegetarian chili and fed it to my coworkers at our holiday party. Less than a week before that I made a thick and hot pork chili that I rolled up in corn tortillas.  This one here was super tasty, and the absolute easiest. Enjoy!

Ingredients:
  • 1 tbsp. vegetable oil
  • 1 lb. ground beef
  • 2 tsp. ground cumin
  • 2-3 tsp. mild or hot chili powder
  • 1 tsp. minced garlic
  • 2 tbsp. gluten free flour (I used Arrowhead Mills)
  • 3 cups  (about 24 oz) canned chopped tomatoes
  • 1 (15-ish oz) can red kidney beans
  • pinch of dried oregano (roll together in palm to crush up good)
  • pinch of  brown sugar
  • salt and freshly ground pepper (according to taste)

Cooking Directions:
  1. Heat the oil in a large pan and brown the beef, breaking it up as it cooks.
  2. Sprinkle on the cumin, chili powder, oregano, salt, pepper, sugar, garlic, and GF flour.
  3. Stirring frequently, cook over medium heat for about 3 minutes. 
  4. Add the tomatoes and their liquid and let simmer 25-30 minutes.
  5. Drain the kidney beans and add just before serving. Heat for another 5 minutes.
  6. Grab a square of Gluten Free Cornbread and dig in!

December 13, 2008

Gluten Free Double Chocolate Chunk Peanut Butter Cookies

A little over a week ago, I found myself trying to figure out what to bring to a foodie gathering being held in the home of fellow food bloggers, Messy and Picky.  Although I had never met Messy and Picky, I knew the foodie in charge of sending out the invitations.  Her name is "E" and she writes the blog, "Foodaphilia." With very little time to prepare, I whipped up a bowl of Golden Sunshine Quinoa Salad, using Bob's Red Mill Organic Quinoa, and a batch of cookies based on my favorite Chocolate Chip Cookie recipe.

I brought my partner Mindy, and my good friend Erika along with me for the ride.  When I entered, I found a beautiful home filled with complete strangers, talking, drinking and eating. They were mostly surrounding a table displaying a wondrous banquet of food.  As we began to intermingle with the guests, I discovered that I knew another person in the crowd.  I began to chat it up with Lauren, the author of the food blog "I'll Eat You."  Lauren, E, and I had all met previously during a dinner gathering for Foodbuzz featured publishers, at Fork Restaurant in Philadelphia.

Throughout the evening, I ate a ton of great food, tasted a variety of wines, and met many cool people.  One of the people I chatted up happened to be a food writer for the Philadelphia Inquirer.  He ended up mentioning me and my blog in his article "On the Side: Live and in person, the food bloggers munch." Thanks Rick Nichols!!!  We left the party with full stomachs, healthy buzzes, and a sense of excited anticipation for the next gathering.

The Double Chocolate Chip Peanut Butter Cookies I whipped up in a flash ended up being quite tasty!  I used Trader Joe's brand Organic Creamy Peanut Butter, but feel free to use any GF peanut butter you like.  It's hard to go wrong with the ingredients in these cookies:)

Cookie Ingredients:
  • 2 sticks softened, unsalted butter
  • 1/2 cup granulated sugar
  • 1/2 cup brown sugar
  • 1/2 tsp sea salt
  • 3 tsp pure vanilla extract
  • 2 large eggs
  • 2 1/5 cups gluten free flour (I used Bob's Red Mill All Purpose GF Baking Flour)
  • 1 tsp baking soda
  • 1/2 cup pure cocoa powder
  • 3 cups chocolate chunks or chips (make sure they're GF!)
  • 1 cup natural peanut butter

Baking Directions:
  1. Preheat oven to 375 degrees F.
  2. In a medium bowl, using an electric mixer, beat the butter, peanut butter, sugars, salt and vanilla until well combined. Beat in the egg. Scrape the bowl using a spatula as it mixes.
  3. In a small bowl, whisk together the GF flour, cocoa and baking soda. Add the dry ingredients to the wet mixture and mix on low speed until just absorbed. Remove the mixture from the electric mixer and incorporate the chocolate chunks with a strong spoon or spatula. 
  4. Using a 1-inch ice cream scooper, drop dough balls about 3 inches apart onto non-greased baking sheets. Bake for 9-12 minutes, or until centers no longer appear moist. Let the cookies sit for 5 minutes before transferring them to wire racks to cool completely.
  5. Grab a tall glass of milk (or soy milk), kick back, and chow down!

December 10, 2008

Gluten Free Lemon Pork Ragout

Ragout is a French term referring either to a main-dish stew, or to a sauce for noodles or any other starchy food.  The basic method of preparing a good ragout involves slow cooking over low heat.  This dish is exactly that!  I've never made a meal like this before, since I'm typically into things I can whip up in a jiffy.  It took a bit of preparation, a pinch of patience, a whole lot of TLC, and was completely worth all the fuss!  It is extremely hearty, delicious, and will likely result in leftovers you'll enjoy for days.

I didn't have ground coriander or saffron powder, but I did have whole coriander and saffron threads, so I put them in a pestle and mortar and ground them up.  If you can, get really small lemons with small seeds.  I tried to de-seed my big lemons the best I could, but a couple made it through.  Although they became soft after being cooked for so long, I wasn't too fond of their taste or texture.  Who knows though, you might like it.  This makes enough for 6 good meals. 

Ingredients:
  • 2 1/2 - 3 lb boneless lean pork shoulder, but into 2-inch pieces 
  • 2 tsp canola oil
  • 2 tsp dried cumin
  • 2 tsp ground coriander
  • 1 tsp saffron powder
  • 2 garlic cloves (minced)
  • 1 large yellow onion (chopped)
  • 1 tsp GF flour (I used Bob's Red Mill All Purpose GF Baking Flour)
  • 1 1/4 cups GF broth (I used Trader Joe's Organic Chicken Broth)
  • 2/3 cups golden raisins
  • 2 lemons, peeled, cut into quarters, plus extra slices for garnishing purposes
  • 2 tsp grated lemon zest (do this before peeling)
  • 6 Italian plum tomatoes, quartered

Cooking Directions:
  1. Marinade the pork with the oil, cumin, coriander, saffron, and garlic in a shallow dish for about 30 minutes.
  2. In a large nonstick pan, saute the pork pieces in small batches over medium-high heat. Remove with a slotted spoon and set aside in a bowl.
  3. Add the onion to the pan and saute for 1-2 minutes over medium heat.
  4. Sprinkle the GF flour over the sauteed onions, then add the broth, golden raisins, lemon, lemon zest, and tomatoes.
  5. Return the meat to the pan. Stir, cover, and let simmer for 1 1/2 to 2 hours, stirring occasionally and adding more broth if needed.
  6. Serve with extra lemon slices, rice, or side salad.
  7. Enjoy!!!


December 7, 2008

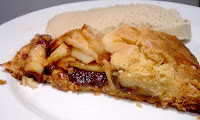
Gluten Free Apple Butter Galette


I don't spend that much time watching TV, but when I do I typically watch something I can learn from. I'm that much of a dork! This recipe was inspired by a segment of a show on the Food Channel called "Real Cooking." It seemed so easy and fun, that I just had to try it out myself.  I decided to experiment with the dough recipe that my Almond Fudge Bars were made with. It worked out pretty well. Being that I had only caught a snippet of the show, I really didn't know what this desert was called. However, I just happened to come across a similar recipe on The Hungry Mouse's blog, and discovered that what I was making was a kind of rustic Galette.


A couple weeks before making this delicious desert, I did some shopping at a place called Linvilla Orchards, and picked up a couple jars of Apple Butter. I absolutely love peanut butter and apple butter sandwiches! YUMMY! The galette on the TV show used fig jam for a base, but I wanted to try apple butter. Next time I'll go with the figs.  I'm sure you can use any kind of apple with this dish, but since I was born on Cortland, NY, I decided to use my favorite apple of all, the Cortland Apple.  

When making the crust, make sure that you spread it on well-floured parchment paper. Also, have a bowl of GF flour close by, since you'll need to keep your hands constantly floured to avoid sticking to the dough. The dough will be very thin, so to avoid tearing, use the parchment paper to lift the dough toward the filling.  It doesn't have to be perfectly formed, just try to avoid leaving any open holes in the dough.

Galette Ingredients:
  • 4 or 5 peeled, cored and sliced apples
  • 1 tblsp cinnamon
  • 1 tsp nutmeg
  • 1/2 cup granulated sugar (plus a little extra for sprinkling)
  • 1/2 cup powdered sugar
  • 1 1/2 cups apple butter
  • 1 cup (2 sticks) softened butter
  • 1/4 tsp salt
  • 1 1/4 cup all purpose GF flour or baking mix (I used Bob's Red Mill)
  • 2 eggs

Baking Instructions:
  1. Preheat oven to 400 degrees F. 
  2. Beat the butter, powdered sugar and salt in a large bowl until fluffy. Add flour and mix well. With GF floured hands, press the dough on a floured sheet of parchment paper.  Work the dough into a circular shape (10 to 12 inches in diameter). 
  3. In a bowl, toss the apple slices with 1/2 cup sugar, cinnamon and nutmeg until well coated. Spread the apple butter into a small circle in the center of the dough.  Pile the apple slices onto the apple butter circle (you may have more than you need). 
  4. Using the parchment paper, lift the dough (one side at a time) toward the center of the apples.  Pinch the dough together as you go.  This part is a little tricky, so be careful not to create any large tears. Once you have the galette fully formed, transfer (still on the parchment paper) to a baking sheet.
  5. Whisk the eggs with a splash of water in a small bowl, and then brush the outside of the galette dough. Sprinkle the egg-coated dough with granulated sugar.
  6. Bake for 35 minutes, or until dough is golden.
  7. Serve with a couple scoops of ice cream and dig in!

LinkWithin

Just So You Know...

The information presented in this blog is intended to educate and entertainment. However, I'm not a medical expert.  I also do not know absolutely everything about Celiac Disease.  What I do know has been learned through trial and error, research, and what has been taught to me by friends who also share my food-related affliction.  Please take the time to do your own research about Celiac Disease and gluten-related issues.  I have a list of links to useful resources along the left-side of this blog. Also, feel free to cross-check my statements. If you find contrary information, please let me know. Thanks so much for visiting Trav's Gone Gluten Free!